Monday, May 5, 2014

Pinzas de Tweezerman

Las mejores pinzas que hay!!! No son baratas, pero valen cada céntimo que cuestan.

Esta es la forma más rápida para expresar mi opinión. Debo añadir que como son caras, solo compro productos cuando tengo algún buen descuento para conseguirlos. En el caso de estas pinzas, tenía un descuento del 20% y como me quedé 2 de anchas, la vendedora me regaló una mini pinza extra. Fue un buen trato para mi.

A ver, como ya he dicho, tengo 3 pinzas de Tweezerman. Solía tener la normal primero,  pero un día se perdió y tuve que reemplazarla, así que me compré 3 más (2 + 1 de gratis). Como en la tienda solo tenían las minis i las anchas, esas son las que me compré.


Sobre las primeras (las que perdí): Són de las mejores que he usado. Comparadas con otras pinzas que he tenido, mis primeras pinzas de Tweezerman eran algo maravilloso! Podía cojer cada pelito que yo quisiera o necesitara quitar. Largo o corto, no importaba. En la siguiente foto podéis ver como eran las pinzas que perdí.


Para reemplazarlas, me compré pinzas de la misma marca. Estaba muy enfadada por haber perdido mis pinzas favoritas, así que al cavo de un par de días me fuí a comprarme otras. Como he dicho antes, me compré 3. Demasiadas??? Quizás, pero, por si a caso.
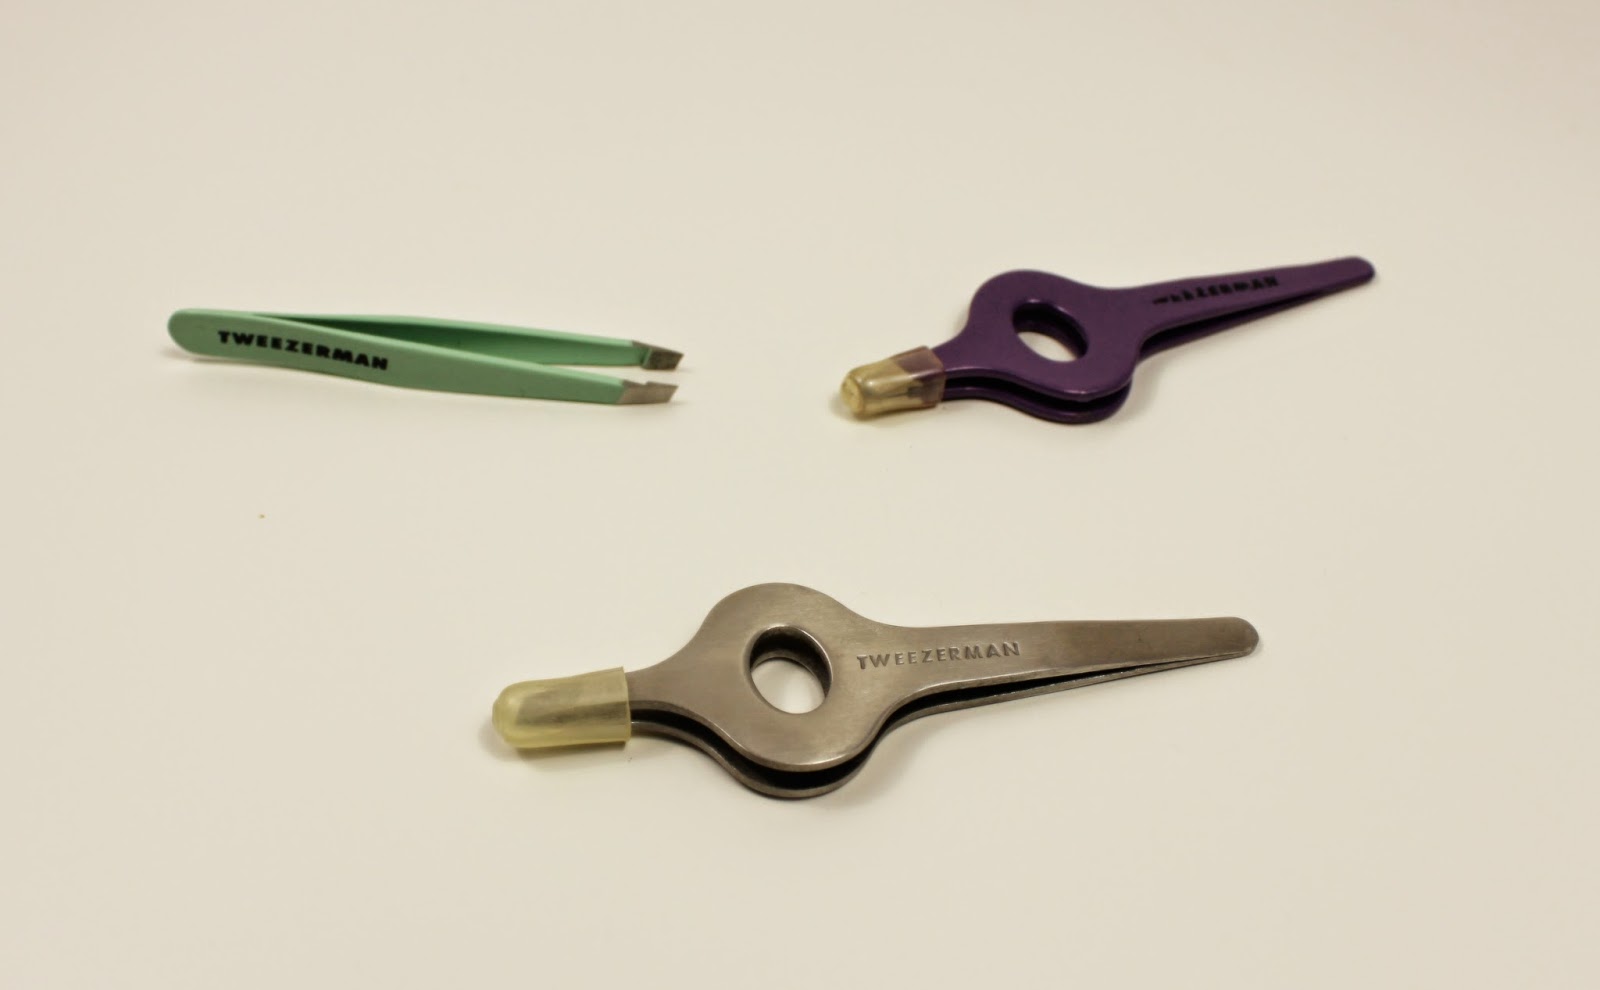


Como podéis ver en la foto superior, no hay mucha diferencia en cuanto a la medida que tienen las minis (la de color verde claro) y las anchas.


Las pinzas verdes son las pequeñas. Cuestan alrededor the 15€. Son puntiagudas y afiladas y al igual que las de tamaño normal, pueden coger cada uno de los pelitos que necesitas quitar. Su tamaño las hace ideales para ponerlas en un neceser o en el bolso. No requieren demasiado espacio y son fáciles de almacenar. Se pueden guardar en el tubito de plástico en el que se venden y así no se ralla nada ni se pierden en el bolso.


La punta de las mini pinzas tiene el mismo acabado y precisión que las pinzas de tamaño normal. Pequeñas o grandes, la calidad es la misma. Ahora toca hablar de las pinzas anchas.


Como he dicho anteriormente, si comparáis las puntas de las diferentes pinzas, se ve claramente que son iguales y tienen el mismo acabado.

Las pinzas anchas de Tweezerman son diferentes solo en esta parte ancha que tienen. Va bien porqué son más fáciles de coger y utilizar. Me pareció raro al principio, pero honestamente, era porqué nunca antes había visto algo como aquello, y era escéptica al pensar que aquello pudiera servir de algo. Creía que era solo algo diferente que le habían cambiado a las pinzas normales solo para "crear" un producto nuevo. La verdad es que cuando las pruebas y te acostumbras, realmente es más fácil quitar pelitos. 

Se venden en una caja de plástico como la que aparece en la foto anterior, y cada una tiene una protección de plástico para la punta (se puede ver en la segunda foto del post).


Ahora que tengo dos pinzas anchas de Tweezerman y he probado tres tipos diferentes de pinzas de esta marca, puedo decir que las anchas son las mejores para mi gusto. Inicialmente las compré porqué las normales se habían agotado, pero me alegro de haberlas conseguido. No me arrepiento de haber gastado 20€ por cada una de las pinzas (era el precio marcado inicialmente, pero pagué meno por la oferta que obtuve).

Sé que en Estados Unidos las afilan para que duren más tiempo. No se cuanto costaría enviarlas des de Europa ni cuanto tiempo tardan en afilarlas. Cuando les toque a las mías ya me informaré.
Image and video hosting by TinyPic

Tweezerman Tweezers Review

Best tweezers ever!! They are not cheap, but they are worth every cent you spend.

This is the fastest way to express my opinion about the Tweezerman tweezers. And let me just add that I only buy expensive products when there is a good discount on them. I had mine at 20% off because I got me 2 wide grip Tweezerman tweezers and the SA added a free extra mini tweezer. It was a very good deal for me.

So, as I mentioned, I have 3 Tweezerman tweezers. I used to have the normal one first, and I fell in love with it, but one day it got lost and I had to replace it, so I bought me 3 more to replace it (2 + 1 free). At the store they only had the mini ones and the wide grip ones, so that's what I got.

About the first one (the one that is missing): It was the best tweezers I had ever used. Compared to other tweezers I had, my first Tweezerman tweezers was better my far. They got every single hair I need to pluck. Long or short, it didn't matter. The next picture shows how was my missing tweezer.


The replace I got me were again, from Tweezerman. I was so pissed off for loosing my fave tweezers that after a couple of days without them I went to the store and bought me some more. As I said before, I bought me 3. A little too much??? Maybe, but you know, just in case.


As you can see, there is not a lot of diffence between the sizes of the small one (the mint tweezers) and the wide grip ones.


 The mint tweezers are the small ones. They cost about 15€. They are sharp and slant and just as the regular ones, they get every single hair you want to remove. Their size make them perfet to put it in your travel makeup bag, or in your purse.  They don't take much space and you can store them in the provided tube they have. This way you can make sure they don't get lost in your bag, or scratch somewhere with their sharp tip.


The tip of the mini tweezers is just as the other ones. Big or small the quality is the same. Let's just talk about the wide grip tweezers now.


Just as I stated before, if you compare the tips of the different tweezers, you can clearly see they look the same. they have the same finishing.

The Wide Grip Tweezerman Tweezers are different just in that wide part, the grip. This wide part really helps when you have to use them. I found it weird at the begining. To be honest, I had never seen anything like that before and I was quite esceptical about them. I thought it was just something they did to "create" a different product. But the truth is that once you get used to that, it's really easier to pluck your brow hairs.

They come in a clear plastic box, just like the one you can see in the picture above, and they also have a plastic protection for the tip (it can be seen in the first picture of this post).


Now that I have two wide grip tweezers by Tweezerman and I have tried three different tweezers by this brand, I can say that for me, these wide grit ones are the best. This is just my prefference. I bought those because the regulare ones were sold out, but it was good that I could get these ones. I don't regret any euro I spent buying them. They were marked at almost 20€ each, but I paid less for them because I got an extra discount. Lucky me.

You can get your tweezers sharpened by Tweezerman. As far as I know, in the States it takes about 6 or 7 weeks to get yours sharpened. I don't know how long it would take to get them if you live in Europe.

Image and video hosting by TinyPic

Friday, May 2, 2014

NATURAL BEAUTY: Exfoliante de azucar y miel

Esta es mi receta favorita para hacer un exfoliante en casa.

Inicialmente esta receta era para hacer exfoliante labial, pero se puede aplicar en todo el cuerpo. Empecé a hacerla hace unos cuantos años, en invierno, cuando mis labios estaban muy secos, y cortados por el frío. Nada funcionaba para curarlos y nutrirlos. Quería mantenerlos sanos y bonitos, pero nada funcionaba. Un día leí esta receta tan sencilla en una revista y decidí probarla. Ahora se ha convertido en uno de mis productos esenciales para el invierno.

Si queréis probarla, aquí está todo lo que necesitáis:
  • 1 parte de azucar (blanco o moreno) 
  • 1 parte de miel 
  • Opcional: Aceite esencial a tu gusto (a mi me gusta añadir 1 o 2 gotas de aceite esencial de lavanda. Es importante que sea aceite esencial y no aceite perfumado o fragancia).


Instrucciones: Mezcla todos los ingredientes concienzudamente y aplica la mezcla sobre la piel limpia. Massajear y aclarar con agua templada. Es una mezcla pegajosa, yo aviso.

Evidentemente, si se quiere hacer solo un exfoliante para los labios, solo se necesita 1 cucharadita de azúcar y una cucharadita de miel (y 1 gota de aceite esencial). Si se quiere hacer para todo el cuerpo, 1 vaso de cada y unas cuantas gotas de aceite esencial. Yo no cuento las gotas que añado cuando hago exfoliante para todo el cuerpo. Me guío por el olfato... cuando me parece que necesita más, añado alguna gota más hasta que ya está, y a veces no añado ningún aceite esencial.

Hay recetas que añaden algún otro tipo de aceite a esta receta (de oliva, girasol, coco...). Yo no lo añado, pero estoy segura que si se le añade también debe dejar la piel suavecita. Si algún día lo pruebo, haré un post con el resultado.

Image and video hosting by TinyPic

NATURAL BEAUTY: Honey & Sugar (Lip) Scrub

This is my favourite homemade scrub recipe ever.

Inicially this recipe was for a lip scrub, but works for all your body. I started making it years ago, in winter when my lips were dry, chapped and nothing worked to nourish them. I wanted to keep them healthy but nothing worked. Then I read about this easy recipe and I gave it a try. Now it's one of my winter beauty essencials. 

If you want to try this here is what you need: 

  • 1 part sugar (white sugar or brown sugar) 
  • 1 part honey. 
  • Optional: Essencial oil of your choise (I like to add 1 or 2 drops of lavender EO. Make sure is essencial oil and not one of those fragance or perfume ones).


Instructions: mix all the ingredients thoroghly and apply to clean skin. Massage and rinse with lukewarm water. It's sticky, so be warned :)

Obviously if you only want to make lip scrub you only need to mix 1 teaspoon sugar and 1 teaspoon honey (and 1 drop EO). If you want to have a scrub for all your body I mix 1 cup each and a few drops EO. I don't count the drops. I just add them until the smell seems right to me, and sometimes I don't use oils.

I know some people add oil (olive oil, sunflower oil, coconut oil...) to this recipe. I don't, but I'm sure your skin must feel very smooth after that. If I ever try it with oil I'll post it.


Image and video hosting by TinyPic

Wednesday, April 30, 2014

Máscara de pestañas Maybelline Colossal Volum Express

Hoy quiero escribir sobre mi máscara de pestañas favorita. Se trata de la máscara de Maybelline Colossal Volum Express Waterproof. 


Solo puedo decir que me encanta esta máscara de pestañas. Siempre me gusta probar máscaras diferentes, pero siempre acabo volviendo a la Colossal Waterproof de Maybelline. Prefiero la versión resistente al agua que no la versión normal.


Lo que más me gusta de esta máscara de pestañas es que dura todo el día y no se escarcha dejando residuos debajo del ojo. 
Cuando llueve se queda fija en las pestañas. No tengo que preocuparme que deje rastro debajo de mis ojos (me ha pasado con otras máscaras de pestañas que he utilizado otras veces. Algunas compradas en el súper, otras más buenas y de marcas más caras...)


Me gusta el cepillo que tiene. Recoje cada pestaña individualmente y la cubre con producto perfectamente. Añade volumen a la base de las pestañas y las alarga considerablemente sin dejar grumos y sin apelmazarlas. Deja mis pestañas largas y bonitas. La fórmula les añade colágeno y se seca más rápido que otras máscaras. 


La única queja que tengo es que es difícil de quitar. Es necesario utilizar un desmaquillante de ojos bifase o con base oleosa para quitarlo, sinó, no se va. Almenos en mi caso.

Respecto al precio, cuesta menos de 10€. 
Image and video hosting by TinyPic
Related Posts
Blogging tips